How to Make a Minecraft Skin Pack (Bedrock): Step-by-Step Guide

How do you make a Minecraft Bedrock skin pack?
Two ways: use the free Skin Pack Creator tool in your browser (drop in PNGs, pick Classic or Slim, download the .mcpack), or build it manually: create manifest.json (two UUIDs), skins.json (skin list + geometry), your PNG files, and texts/en_US.lang (names), then zip the contents into a .mcpack file.
A Minecraft skin pack is a small folder of files (a couple of JSON configs, one or more PNG images, and a text file for the names) zipped up into a single .mcpack file that players double-click to install. In this guide you will make one from scratch.
There are two ways to do it, and both are free:
- The easy way: use my Skin Pack Creator tool right in your browser. You drop in your PNG skins, pick Classic or Slim, see a 3-D preview, and download the finished
.mcpack. Nothing is uploaded to a server. - The manual way: create the four files yourself (
manifest.json,skins.json, your PNGs, andtexts/en_US.lang), then zip them. This gives you full control and is useful if you want to edit an existing pack.
Either way, all you need is a PNG image of your skin (64×64 pixels is the standard), a text editor, and about ten minutes.
Plan your skin pack
Before you open any editor, decide on three things:
- How many skins? A pack can hold one skin or dozens. Each skin is a separate PNG file.
- What are their names? You will type these into
skins.jsonand the language file. Pick short, clear names likeFoxClassicorSteveBlue. Avoid spaces; use CamelCase or underscores. - Classic or Slim for each skin? Classic (Steve-style) has 4-pixel-wide arms. Slim (Alex-style) has 3-pixel-wide arms. You can mix both in the same pack; each skin entry gets its own
geometryvalue.
Write your answers down. You will need the exact names when you fill in the JSON files, and a mismatch between skins.json and the language file will show blank or raw-key names in game.
Start from a skin template
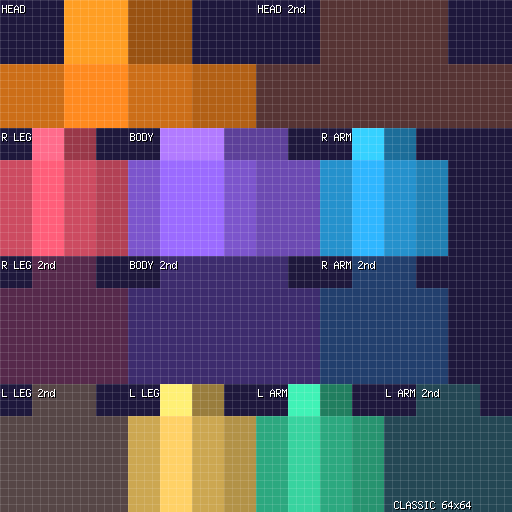
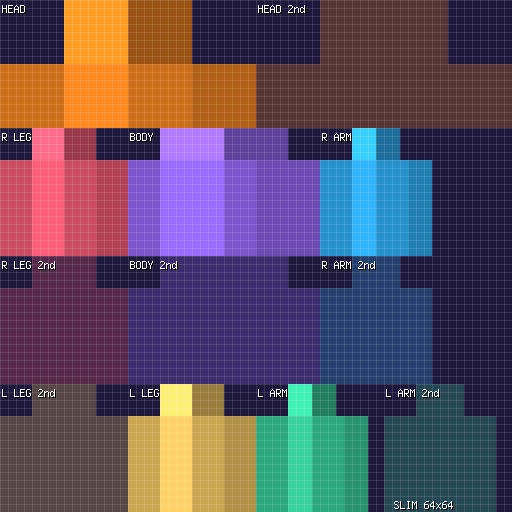
Every Bedrock skin is drawn on a fixed pixel grid. The standard size is 64×64 pixels (the official Microsoft sample pack uses this size). The grid is divided into regions for the head, body, arms, legs, and a second "overlay" layer for hats, jackets, sleeves and trousers.
Here is a labelled Classic (4-pixel arm) template:
And the Slim (3-pixel arm) version, notice the narrower arm columns:
Download Classic template (64×64 PNG) Download Slim template (64×64 PNG)
How the two layers work: the top half of each limb region is the inner (base) layer: skin, shirt, pants. The bottom half is the outer (overlay) layer: slightly larger, used for hats, jackets, sleeves and trousers. Transparent pixels in the overlay let the inner layer show through. You do not need to fill in the overlay; leave it transparent if you do not want a hat or jacket.
For a full breakdown of every region and its pixel coordinates, see Skin sizes and UV layout.
Paint your skins
Any image editor that handles PNG with transparency will work. Here are the options the official Microsoft guide and community use:
- Blockbench: free, has a dedicated Minecraft Skin mode with a 3-D preview. The official Microsoft guide recommends it: "You can use Blockbench to create a usable skin PNG for your skin pack."
- Paint.net: named in the Microsoft guide as a "basic graphic-editing program." Free on Windows.
- GIMP, Krita, Aseprite: other popular free (or paid) pixel editors.
- Online editors: many free web-based skin editors exist (search "Minecraft skin editor online").
Practical tips while you paint:
- Keep the canvas at 64×64 (or 128×128 for an HD version; see the FAQ below).
- Save as PNG. JPEG does not support transparency and will break the overlay layer.
- Only the overlay (second) layer uses transparency to reveal the inner layer. The inner layer should be fully opaque where you want colour to show.
- Match the arm width to your chosen model: 4 px for Classic, 3 px for Slim. A mismatch will make the arms look cut off or show a gap in game.
The easy way: Skin Pack Creator (no files to write)
If you would rather not touch JSON, my Skin Pack Creator does the whole job in your browser:
- Open the Skin Pack Creator page.
- Give your pack a name (e.g. "Foxy's Skins") and an optional author name.
- Click Add skins and select your PNG files. For each one, pick Classic or Slim.
- Check the 3-D preview on the right to make sure the skin looks right.
- Click Download .mcpack. The file is built entirely in your browser; nothing is uploaded to any server.
The tool also lets you open an existing .mcpack (or .zip) to edit it: change names, swap skins, reorder them, then download the updated pack. Your work is saved in the browser's local storage, so you can close the tab and come back.
Once you have the .mcpack file, skip ahead to Test it in Minecraft.
The manual way: build the pack files
A skin pack is a folder with exactly these items at its root:
My_Skin_Pack/
  manifest.json
  skins.json
  fox_classic.png
  fox_slim.png
  texts/
    en_US.lang
    languages.json   (optional)
Skin PNGs must sit at the root of the pack, not in a subfolder. Custom geometry files are not supported in skin packs.
1. manifest.json
This file identifies the pack. It needs two different UUIDs (one for the header, one for the module) and a version number. Generate two unique v4 UUIDs at uuidgenerator.net.
{
  "format_version": 2,
  "header": {
    "name": "My Skin Pack",
    "uuid": "PUT-YOUR-FIRST-UUID-HERE",
    "version": [1, 0, 0]
  },
  "modules": [
    {
      "type": "skin_pack",
      "uuid": "PUT-YOUR-SECOND-UUID-HERE",
      "version": [1, 0, 0]
    }
  ]
}
The two UUIDs must be different from each other and from any other pack's UUIDs. Reusing a UUID will cause a conflict and the pack may be ignored.
2. skins.json
This lists every skin in the pack, its geometry type, and the PNG file name.
{
  "serialize_name": "MySkins",
  "localization_name": "MySkins",
  "skins": [
    {
      "localization_name": "FoxClassic",
      "geometry": "geometry.humanoid.custom",
      "texture": "fox_classic.png",
      "type": "free"
    },
    {
      "localization_name": "FoxSlim",
      "geometry": "geometry.humanoid.customSlim",
      "texture": "fox_slim.png",
      "type": "free"
    }
  ]
}geometry.humanoid.custom= Classic (4-px arms, Steve-style).geometry.humanoid.customSlim= Slim (3-px arms, Alex-style).texturemust match the PNG file name exactly, including capitalisation and extension.typeshould be"free". The"paid"value is only for Marketplace partners and will lock the skin for regular players.- Skins appear in the game in the same order they are listed here.
For a full field-by-field explanation, see skins.json explained.
3. texts/en_US.lang
This plain-text file gives the display names that show in the Dressing Room. One key=value per line:
skinpack.MySkins=My Skin Pack
skinpack.MySkins.by=YourName
skin.MySkins.FoxClassic=Fox (Classic)
skin.MySkins.FoxSlim=Fox (Slim)
The keys must match the localization_name values in skins.json exactly. If they do not match, the names will appear as raw keys or be blank in game.
4. texts/languages.json (optional)
A JSON array listing the language codes in your texts folder. For English only:
["en_US"]The official Microsoft sample pack works without this file, so it is recommended but not strictly required for a single-language pack.
Package it as a .mcpack
The final step is to bundle the files into a single .mcpack:
- Open your pack folder (the one containing
manifest.json,skins.json, the PNGs, and thetexts/folder). - Select all the files and folders inside (not the outer folder itself) and create a ZIP archive.
- Rename the file from
My_Skin_Pack.ziptoMy_Skin_Pack.mcpack.
No wrapper folder. When you unzip the .mcpack, manifest.json must be at the very top level. If it is inside an extra folder (e.g. My_Skin_Pack/manifest.json), Minecraft will not find it and the import will fail.
To edit a .mcpack later, rename it back to .zip, extract, make your changes, re-zip the contents, and rename to .mcpack again. If you are making a separate copy of the pack, generate two new UUIDs in manifest.json first.
Test it in Minecraft
Before you share your pack, make sure it actually imports and the skin looks right:
- Double-click the
.mcpackfile (on Windows) or open it with Minecraft (on mobile). Minecraft launches and shows an import message. - Wait for the "imported successfully" confirmation.
- Open the Dressing Room from the main menu.
- Go to Classic Skins. Your pack should be listed there with the name from your language file.
- Select a skin and click Equip. Check it in a world to make sure the arms, hat and jacket look correct.
If the pack does not appear, the most common fix is to turn off Only Allow Trusted Skins in Settings → General. For a full list of fixes, see How to install skin packs or Troubleshooting.
Updating your pack later
When you want to change a skin or add a new one:
- Same pack, new version: keep the two UUIDs the same and raise the
versionnumber inmanifest.json(e.g. from[1, 0, 0]to[1, 1, 0]). Re-import the.mcpackand it should replace the old one. - A brand-new, separate pack: generate two new UUIDs so it does not conflict with the old one.
Players who already imported your old pack will need to re-import the new .mcpack to get the update. Custom skin packs do not auto-update.
Common problems
If something goes wrong, these are the five most likely causes:
- Pack does not appear at all: "Only Allow Trusted Skins" is on, or the ZIP has a wrapper folder. Fix: Settings → General → toggle off; re-zip with files at the root.
- Skin names show as
skin.xxx.yyyor are blank: the keys inen_US.langdo not match thelocalization_namevalues inskins.json. - Arms look cut off or have a gap: the skin was painted for Classic but set to Slim (or vice versa). Change the
geometryvalue or re-import with the correct model type. - Texture is missing (default Steve shows): the
texturefile name inskins.jsondoes not match the actual PNG, or the PNG is in a subfolder instead of the pack root. - JSON error / pack ignored: a missing comma, trailing comma, or wrong quote in
manifest.jsonorskins.json. Paste the contents into a free JSON validator to find the syntax error.
For a more complete troubleshooting table, see Skin pack troubleshooting.
FAQ
Can I sell my skin pack?
Skin packs with "type": "paid" are only accessible to Marketplace partners. For everyone else, set the type to "free". If you want to sell through the in-game Marketplace, you would need to join the Minecraft Marketplace Partner programme. That is a separate business arrangement with Microsoft, not something you can enable in the JSON.
Does a skin pack work on Xbox, PlayStation or Switch?
No. Custom skin pack import (.mcpack files and single PNGs) is not available on consoles. On Xbox, PlayStation and Nintendo Switch, players can use Marketplace skin packs and the Character Creator instead.
Can I use 128×128 (HD) skins in a pack?
Single imported skins on Windows and mobile accept 64×32, 64×64 or 128×128 PNGs. For skin packs specifically, the official guides do not state a size limit, and 128×128 is reported to work on most platforms, but it is not explicitly documented. 64×64 is the safe, standard choice and is what the official Microsoft sample uses.
Do I need a pack_icon.png?
No. None of the official skin-pack guides or the Microsoft sample pack include or require a pack_icon.png. It is not part of the skin pack format.
Will my skin pack sync to other devices?
Custom skin packs are stored on the device where you import them. They do not sync across devices through your Microsoft account. Each device needs its own import. (Marketplace purchases, by contrast, do follow your account.)
Related guides
- Skin Pack Creator (free tool)
- Free skin templates & sample pack
- skins.json explained
- Classic vs Slim: which should you pick?
- How to install skin packs
Sources
- Microsoft Learn: Packaging a Skin Pack
- Microsoft Learn: Change Your Look: An Introduction To Skin Packs
- Microsoft sample skin pack
- Minecraft Wiki: Skin
- Minecraft Wiki: Skin pack
- Minecraft Wiki: Marketplace
- Mojang bedrock-samples: en_US.lang
- Mojang bedrock-samples: humanoid.custom.geo.json
- Bedrock Wiki: Skin Packs
 Get notified about new packs
Join the Discord for update announcements, help and sneak peeks.
Join Discord